Having a custom recovery on an Android device unlocks loads of miscellaneous features that you can use. You can choose to root your device for advanced user access to customization on various levels. One of the best custom recovery software for Android is the Team Win Recovery Project or TWRP Recovery. The TWRP recovery helps users to save, install, backup, and restore the firmware on Android when rooting or flashing your device with new firmware. Here’s how to install TWRP Recovery without Root on Android.
Before jumping into the guide, we’ll be clearing a few things firsthand. On any Android device, you have to first unlock the bootloader to install TWRP Recovery. Again, each and every device has a different method of unlocking the bootloader. Some may have a complex method while some bootloaders can be unlocked by going to developer settings in the Android Settings.
Also read: How to Install GCam Mod on any Android device
Another thing to clear is that you don’t need to have root access to install TWRP Recovery as compared to traditional beliefs. All you need is an unlocked bootloader. Again, unlocking the bootloader in some phones may wipe out all the data. So, make sure to take a proper backup before moving ahead to installing TWRP without root access on Android.
What is Team Win Recovery?
TWRP, or Team Win Recovery Project, is a free program that helps manage the software on Android phones. With TWRP, you can save, set up, back up, and restore your phone’s software easily. This is really useful if you want to try new software or make changes without messing up your phone.
Here, we’ll guide you on how to install TWRP on your Android phone without needing to root it. Rooting a phone is like getting the highest level of access to your device, which can be risky.
Important: You don’t have to root your phone to install TWRP, but you do need to unlock the bootloader. Unlocking the bootloader will delete everything on your phone. Be aware that the steps to unlock the bootloader differ for each phone model.
How to Install TWRP Recovery without root on Android
- Firstly, make sure to backup your phone to not lose any data from any issue in the installing process.
- Before you have anything to do with your phone, you first need to install Android SDK Tools on your PC. You have to go to the Android Developer Website and download the tool under “Command line tools only” with respect to your operating system.
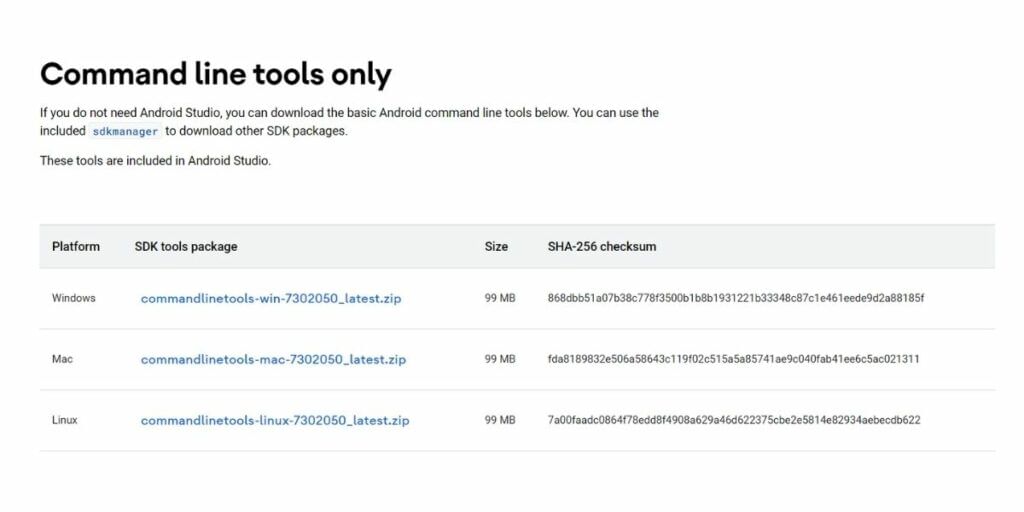
- After you finish downloading the Android SDK Command line tool, extract the zip file in a location of your choice on your PC.
- Now, you need to go to the TWRP – Team Win Recovery Project website and download the TWRP image for your Android device. Select the manufacturer of your phone and select the model of your device to download the image file.
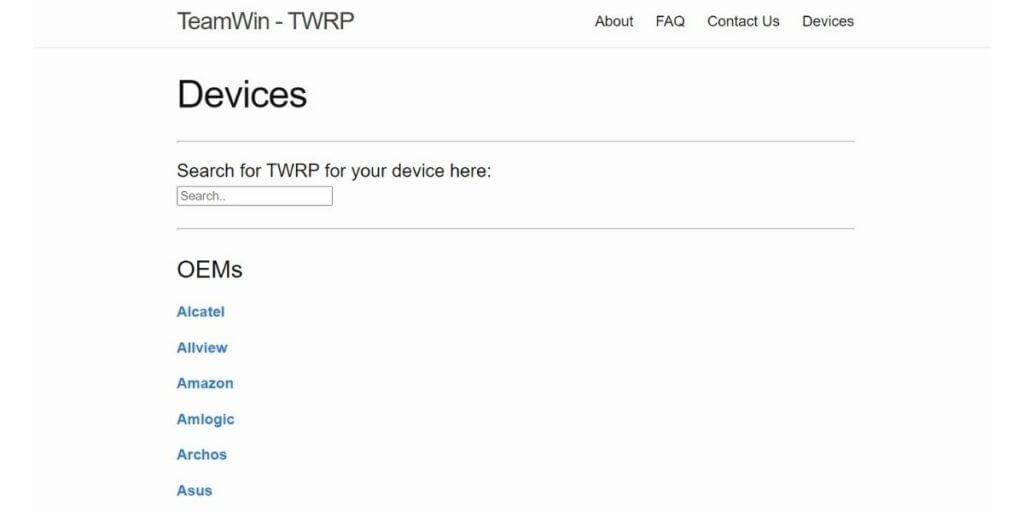
Download TWRP Recovery img file for your phone
- Moving on to the Android device, go to Settings > About > tap on “Build Number” for seven times to get access to Developer options.
- Now, after enabling Developer options, open it and select “USB Debugging” and select Ok when prompted to Allow it.
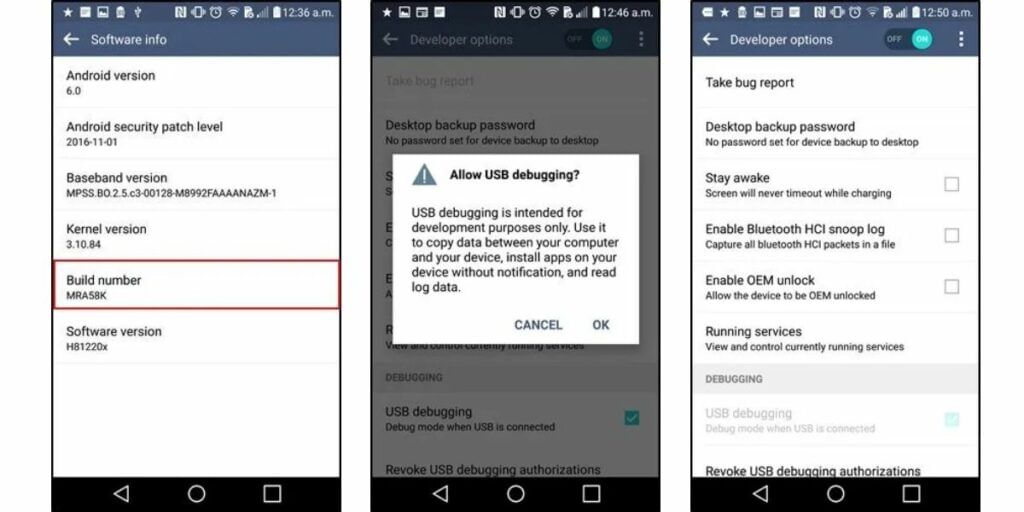
- Next, scroll down through Developer options and search for “Enable OEM Unlock” and select it to allow OEM Unlocking. Upon selecting, the device will prompt you to enter your phone password and will show a message saying that enabling it will disable the device protection feature. Follow through it and enable it.
- Now, the work is with connecting your Android device to your PC via the micro-USB or Type-C cable. After connecting your device to your PC, a prompt will show up on the device asking you to allow USB Debugging. Click on “Always allow from this computer” and hit “Ok”.
- The installation process of TWRP recovery without root starts here. You will need to open command prompt on your PC where you have extracted the Android SDK Tools file. Also, copy the TWRP image file that you have downloaded to this folder.
- After copying the TWRP img file to the Android SDK Tools folder, open command prompt by right clicking within the window. In the command window, type the following command.
- adb devices
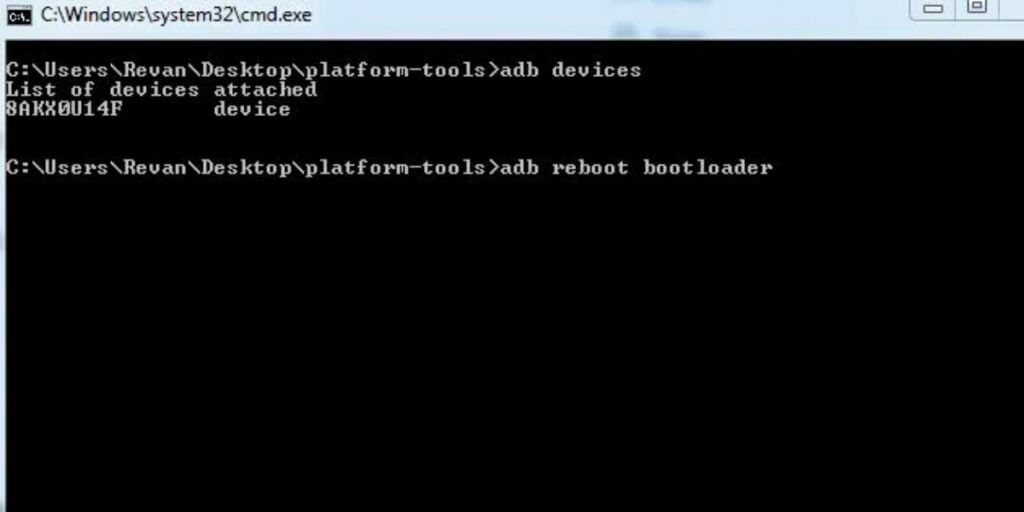
- Now, you can see that the connected Android device is listed here. Press enter and type the following command to reboot your Android device into bootloader/fastboot mode.
- adb reboot bootloader
- Now, enter the below command by replacing the “X” with the version of TWRP img file you downloaded and copied to this folder.
- fastboot flash recovery twrp-3.1.X-XXX.img
- And then, after entering the exact TWRP img file you downloaded, run the following command.
- fastboot reboot
- That’s it! You will now be able to boot into TWRP recovery mode on your Android device. This is how to install TWRP Recovery without root on Android.
Also read: How to install Battlegrounds Mobile India
Now that you have successfully installed TWRP recovery on your Android phone, as mentioned, you can boot into the mode and flash all your favorite ROMs, gain root access, and unlock the god-mode of customization. Booting into recovery mode may vary from manufacturer to manufacturer. However, it is always a combination of volume rockers and the power button which you have to press simultaneously to enter the recovery mode.
Also read: How to download Instagram Reels on Android and iOS
Drawbacks of Installing TWRP Recovery
While installing TWRP Recovery mode comes with its own perks, it also can go wrong if not done right and brick your device. We recommend not to flash custom recovery on your device if your OEM is not providing a warranty for bootloader unlocked phones. Overall, it is always essential to backup your device without messing with the development side of it.
Also read: How to Recover deleted photos from WhatsApp
Booting into TWRP Recovery
Booting into TWRP Recovery is a process that can differ from one device to another. Usually, it involves a specific combination of button presses. For many devices, you’ll need to press and hold the power button along with the volume up button while the device is turned off. This action will start the device in TWRP recovery mode.
Conclusion
Installing TWRP (Team Win Recovery Project) on an Android phone allows you to manage your device’s software more effectively without needing root access. By unlocking the bootloader (which does erase all data), you can install TWRP, which lets you install, backup, and restore firmware easily. This provides a safety net for trying new software or making changes to your device.
FAQs:
Do I need to root my phone to install TWRP?
No, you don’t need to root your phone to install TWRP, but you do need to unlock the bootloader, which will delete all your phone’s data.
What does unlocking the bootloader do?
Unlocking the bootloader allows you to install custom recovery like TWRP. It’s necessary for installing TWRP but keep in mind it will erase everything on your device.
Can installing TWRP void my warranty?
Yes, in many cases, unlocking the bootloader and installing a custom recovery like TWRP can void your phone’s warranty. It’s important to consider this before proceeding.
Click here if you’re looking to sell phone online, or want to recycle old phone, and Cashify will help you get the process completed right at your doorstep.


