To get the best sound quality on Spotify, you do not necessarily need to buy brand-new headphones/speakers. Yes! You read it right! Spotify is a popular audio streaming service that has opened the door for millions of creative artists and transformed how we listen to music. Still, many users are not aware that they can improve the sound quality of Spotify through some simple settings. If you are one of them, read this article thoroughly and maximise your listening experience.
Try the following audio settings on Spotify to experience the difference.
Also read: 16 Secret Spotify Tips And Tricks We Bet You Didn’t Know About
How to Improve Sound Quality on Spotify on Mobile
Here are a few settings that you can try to improve sound quality on Spotify
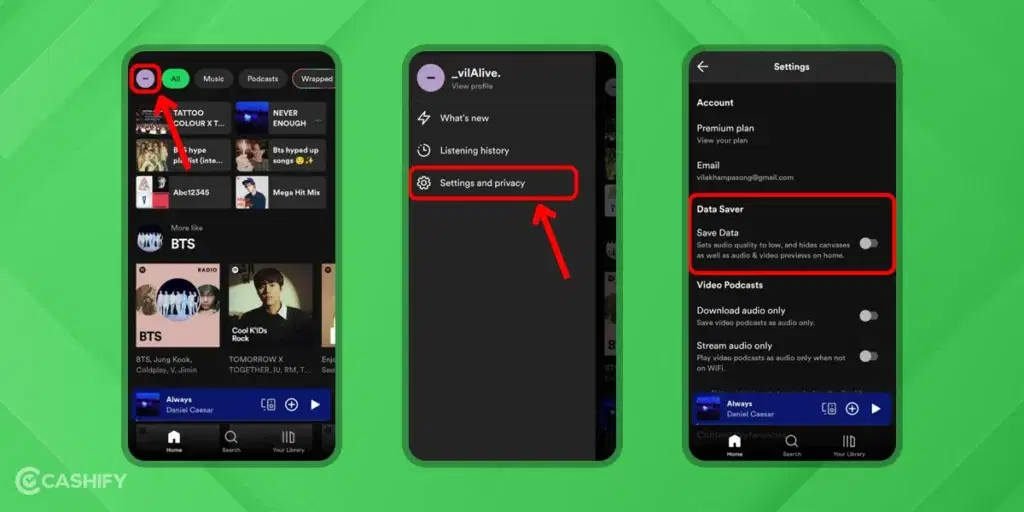
Data Saver: Off
Turning off the data saver setting reduces the data used while listening to the music. However, it drops the audio quality to low. Keep this thing in mind. Follow the below-mentioned steps for it.
- Launch the Spotify application on your mobile.
- Click on your profile pic. You will see the profile pic in the top left corner.
- Now, tap on the options menu -> Settings and Privacy.
- Here, you will see the data saver feature. Turn it off.
Audio Quality: Very High
Spotify offers you four different types of playback quality. They are as follows.
- Low – 24kbps
- Normal – 96kbps
- High – 160kbps
- Very high – 320kbps – only for Spotify Premium Users.
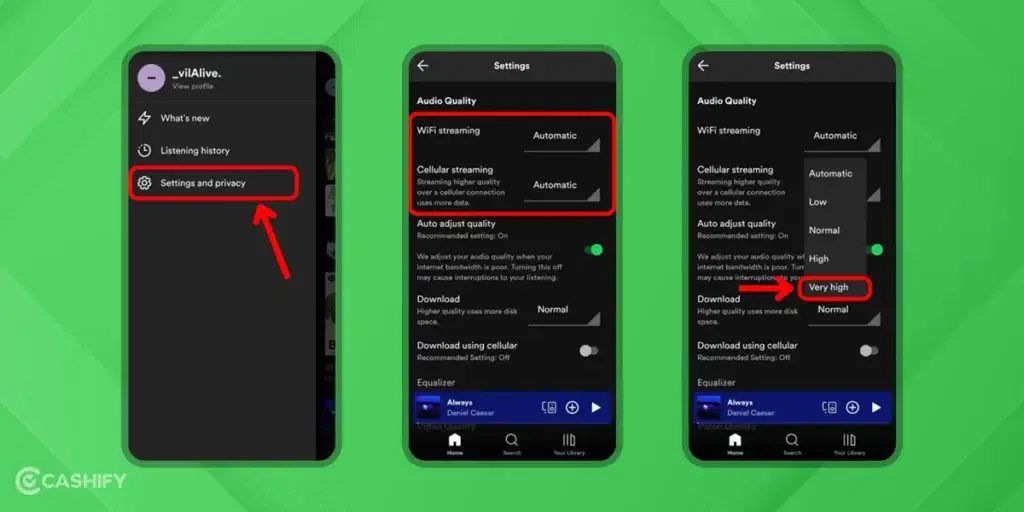
By setting the audio quality to very high, you can improve the sound quality. You can set audio quality to very high for both Wi-Fi and mobile streaming. If you are unaware of which option you need to set the audio quality to very high, you can go for the Automatic option. Here are the steps to do it.
- First, launch the Spotify app and navigate to Settings and Privacy.
- Now, when you scroll down, you will see the Wi-Fi streaming and Celluar streaming
- Change its settings. By default, it is Automatic. Change it to the Very High or High.
Also read: How To Set Spotify Music As An Alarm?
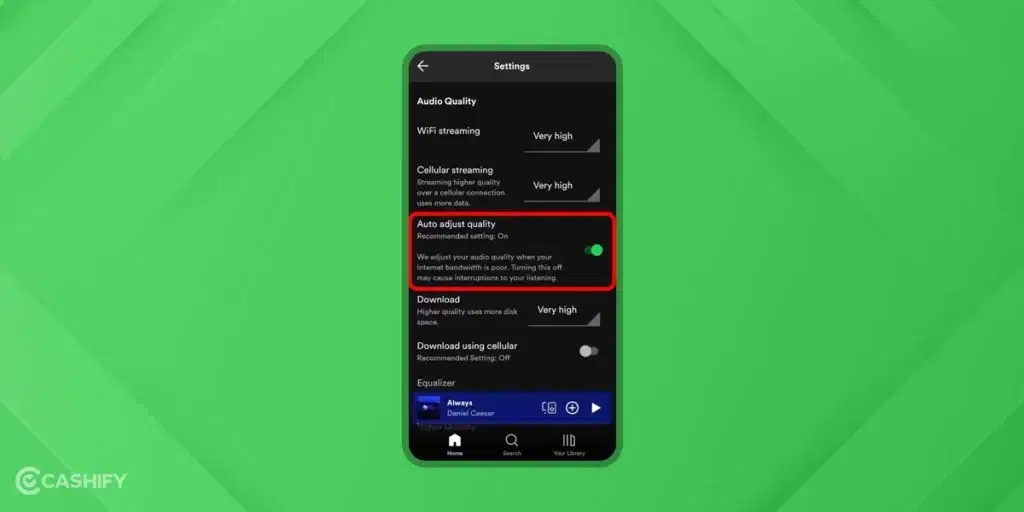
Auto Adjust Quality: On
By doing the Auto Adjust Quality feature ON, you don’t have to worry about the cellular signal strength. If you turn it off, it may cause interruptions when listening to audio.
Volume Level: Normalise
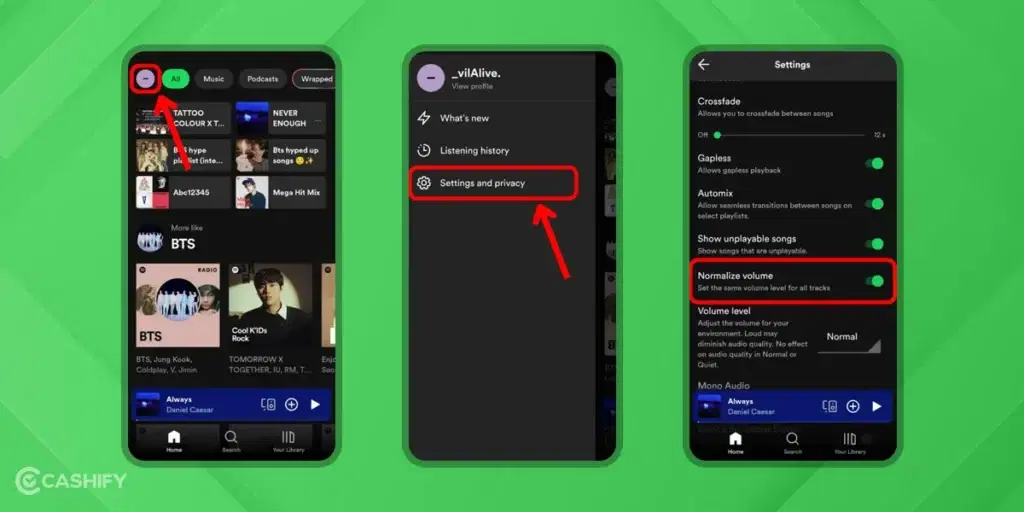
Sometimes, when you play the song, the current song seems louder than the previous one. In such a situation, you can turn on the Normalize Volume option. So, it will automatically bridge this sound gap. Check out these steps to learn how to do it.
- Open the Spotify app and navigate to Settings and Privacy.
- Turn the Normalize Volume option ON.
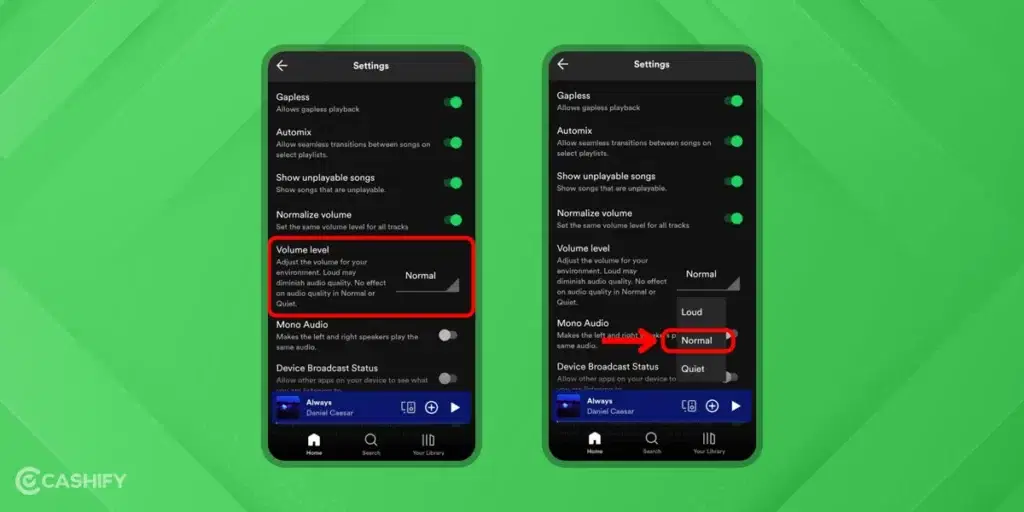
Here, you will get the three options for Volume Level settings :
1. Loud
2. Normal
3. Quiet
If there is too much ambient noise, you can set the Volume Level to Loud, but it will lower the audio quality. Therefore, instead of setting Volume Level to the Loud, use the noise-cancelling headphones/earbuds.
How to Improve Sound Quality on Spotify on Desktop
If you want to improve sound quality on Spotify on a desktop, you can do it in the following ways.
Set Audio Quality to Very High
To set the audio quality to very high, here are a few steps that you need to follow.
- Launch the Spotify app on the desktop.
- Now, tap on the profile picture.
- Choose settings
- When you scroll down, you will see the Audio Quality section.
- Set the audio quality to Very High.
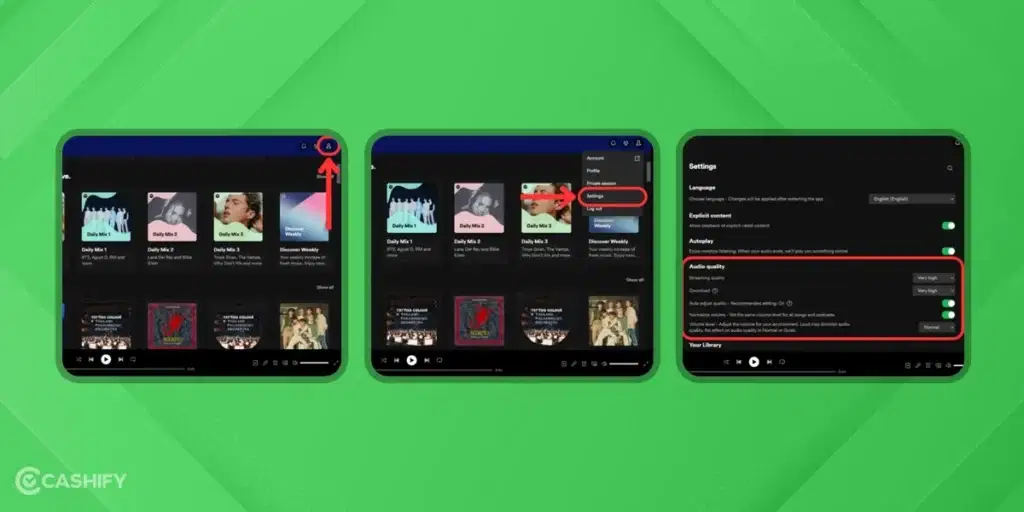
Volume Level: Normalise
You can set the Normalize Volume Level feature ON to keep a similar volume level (for all podcasts/audio). Now, it will play all your content at a similar volume level. To do that, you must go to Settings and Privacy and use the Normalise Volume Toggle feature ON. Here, you will get the three volume levels – Loud, Normal, and Quiet.
Also read: Apple Music Vs Spotify- Is Apple Music Better Than Spotify
Steps to Modify Spotify Equalizer Settings on Smartphone
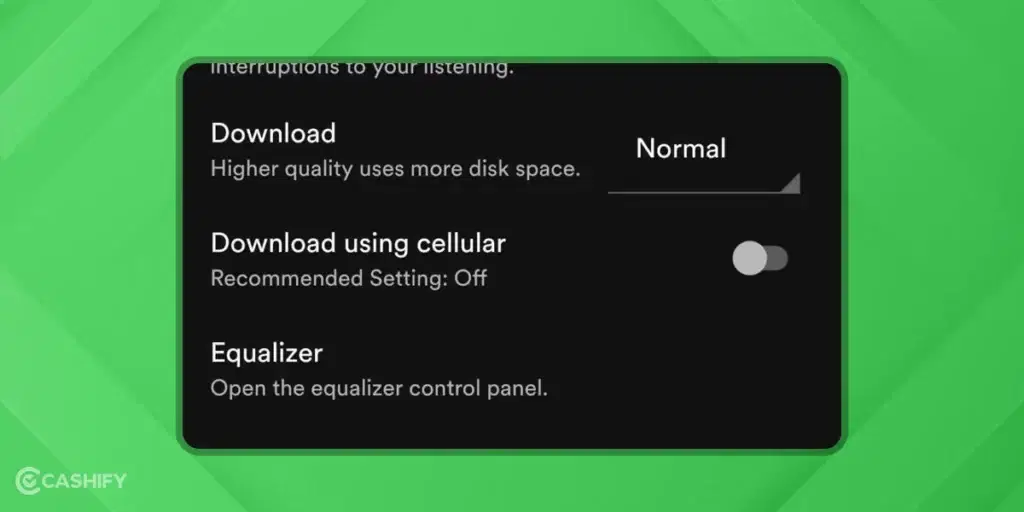
If you use an Android mobile, here are steps that you need to follow to change the Spotify Equalizer Settings.
- First, launch the Spotify application.
- At the top-right corner, you will see the gear icon. Click on it to access Settings.
- After that, scroll down and choose Audio Quality.
- Click on the Equalizer.
If you are unable to see this option on your phone, it means your phone does not support it. Therefore, you need to download third-party apps like Equalizer FX.
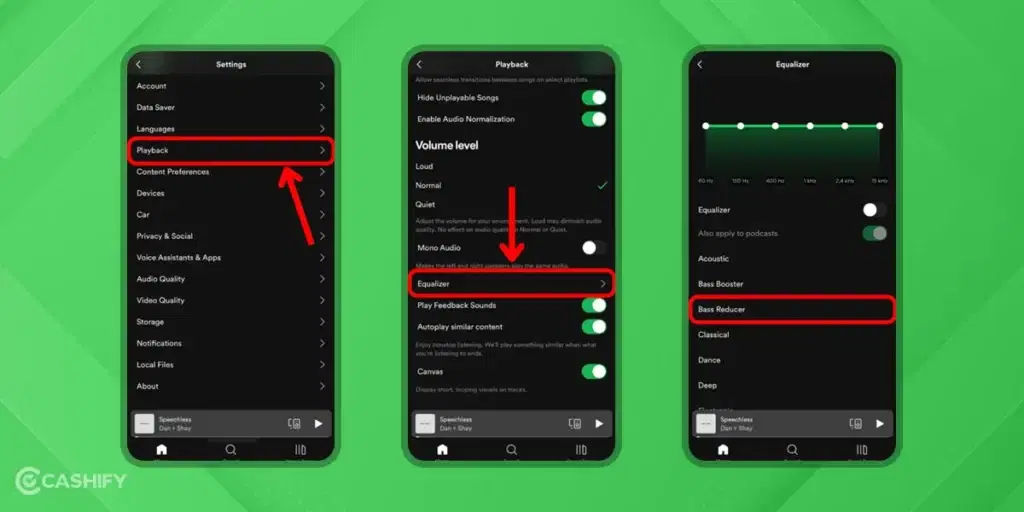
If you use an iPhone, you need to follow the steps below.
- Launch the Spotify app on your iPhone.
- Navigate to the Settings and Privacy.
- Click on Playback -> Choose Equalizer.
Here, you will get many options like classical, dance, deep, etc. You can choose according to your preference.
Also read: Spotify X OpenAI: Everything To Know About Spotify AI DJ
Steps to Modify Spotify Equalizer Settings on PC/Desktop
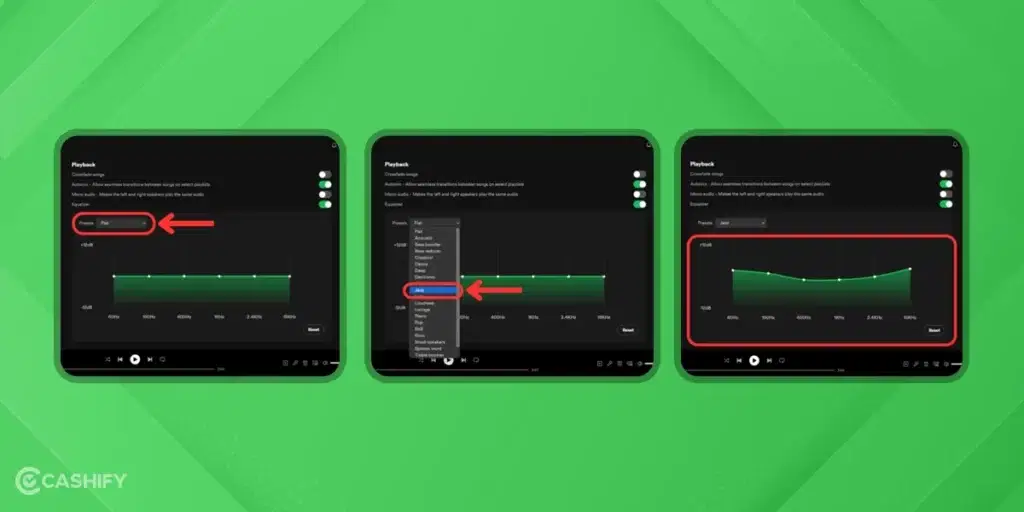
If you want to change Spotify Equalizer Settings on desktop, here are the steps to do it.
- Launch the Spotify app on your desktop.
- Now, tap on the profile picture.
- Choose Settings -> Playback.
- Click on Preset and choose your preferred option. You can even manually set the frequency adjustment.
If you feel you have made any mistake, click on Reset.
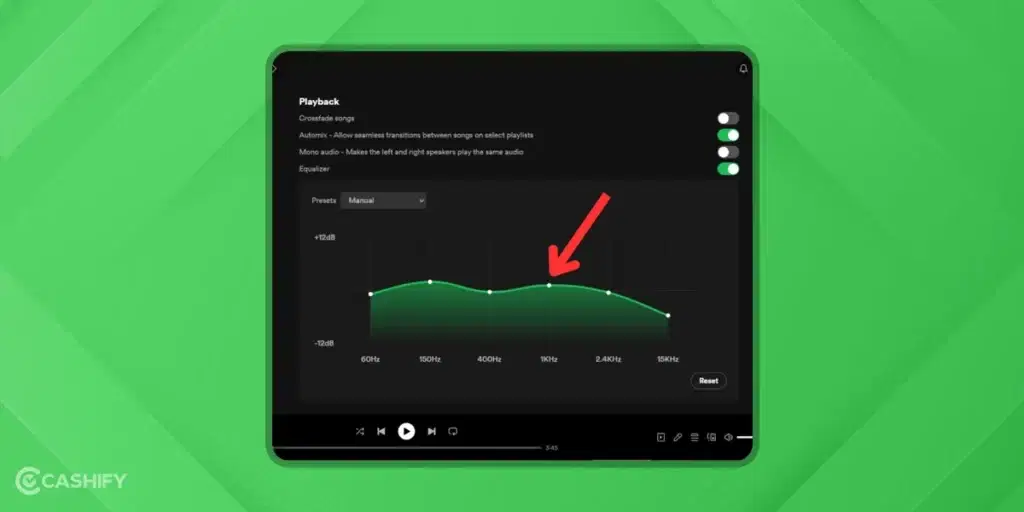
Also read: How to Download Songs in Spotify
Hardware Acceleration
Hardware Acceleration uses existing hardware and optimises your Spotify app’s performance. It works perfectly for Windows and macOS.
Here are the steps that you need to follow to do it.
Windows
- Navigate to Settings -> Show Advanced Settings.
- You will see Enable Hardware Acceleration toogle. Please turn it on.
Mac
If you are a Mac user, click on the Spotify menu and choose Hardware Acceleration.
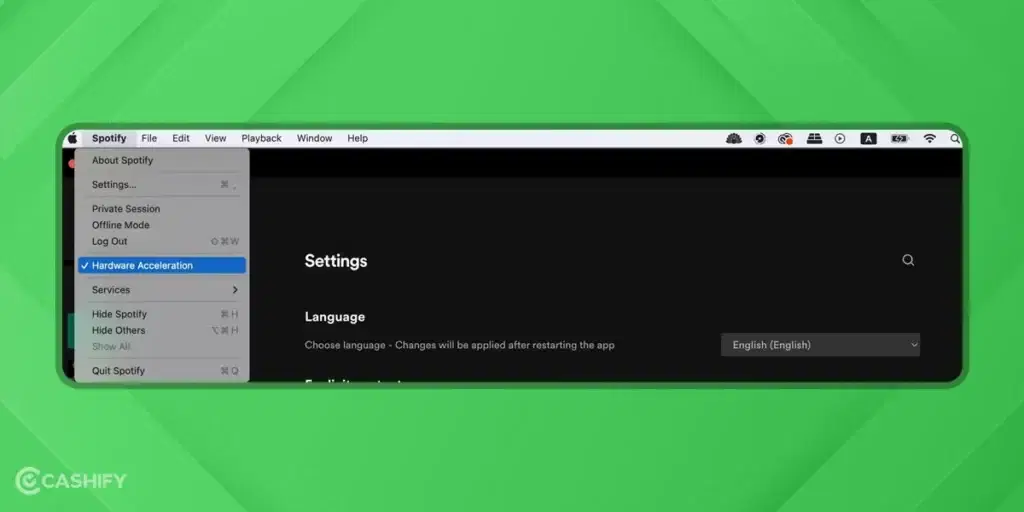
Till now, you have chosen the best settings options to improve the sound quality on Spotify. Now, it’s time to fine-tune the little details. To do so, you need to set the following features.
Corssfade
Setting this feature will eliminate all the awkward silences between songs if you are doing a workout or any focused work.
If you are an Android user, you can customise this setting by clicking on Home -> Settings -> Crossfade. After that, you will see the slider. Drag it as per your preference.
If you are an iOS user, navigate to Home -> Settings -> Playback. Now, choose Crossflag and drag its slider according to your preference.
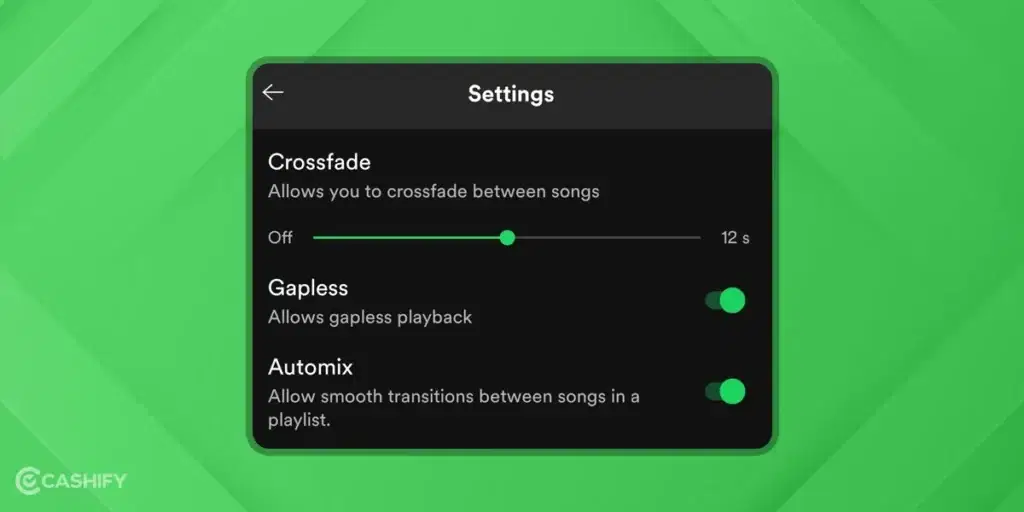
Automix
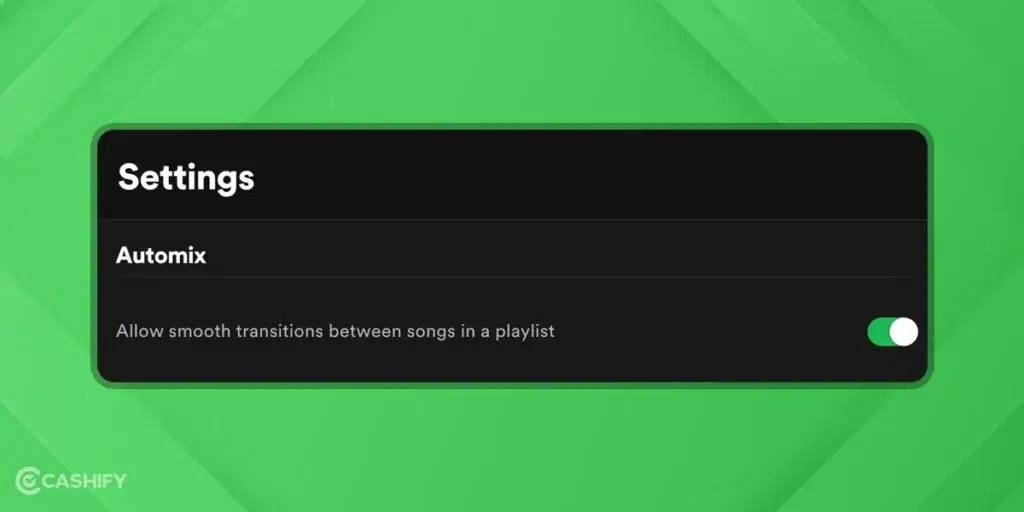
Another feature is Automix. Spotify’s AI feature ensures smooth transitions. All you need to do is go to Settings and toggle on the Automix.
Gapless
It is perfect for listening to classical or live music. It ensures that your music don’t get mixed. To ON the Gapless toggle, go to Settings -> Gapless and turn it ON.
Ending Note
Spotify has offered us better ways to enjoy our favourite music through the years. Spotify provides an endless entertainment variety and various ways to experience them better. Without thinking much, give the above-discussed settings to try and improve sound quality on Spotify to get the best listening experience.
Also read: Spotify Is Currently Set To Offline: Easy Guide On How To Fix It?
If you’ve just bought a new phone and don’t know what to do with your old phone, then here’s your answer. Sell old mobile to Cashify and get the best price for it. If you are planning to buy a new phone, check out Cashify’s refurbished mobile phones. You can get your favourite phone at almost half price with 6 6-month warranty, 15 days refund and free delivery.


