Data Security and User Privacy are more important than ever; with some alleged Chinese apps trying to steal as much user data as possible, it’s important to keep our smartphones secure. Our smartphone holds every bit of information about us, starting from our daily schedule and personal media to our bank details. We all need to secure Android phone and tablets to keep our data safe.
Many of us tend to take privacy of our smartphones for granted. But what we do not realize is that we end up overlooking many privacy settings on our phones. And this, can be very risky for your data and you. However, there are tons of settings buried within our Android smartphones and tablets that can help us better control how we secure Android phone and personal information.
Even when we are travelling, Android also saves the location to show us geo-specific details such as traffic details, nearby restaurants, and more. So, in case if our phone gets into the wrong hands or any cybercriminal breaches, there will be nothing more awful than that. Hence, it should be our priority to keep our phones secured in every possible way.
Also read: Smartphone reviews
The best part is Android itself offers enough options to safeguard your data. But if you’re not a tech geek, it can be a bit tricky to personalize these security settings on your phone. That’s why we are here today with 5 Android Settings to Secure your Android phone.
Change these settings to make your Android smartphone secure!
Android is packed with a handful of powerful security features. You may not know, but some are already enabled by default, like blocking app downloads from unauthorized sources or finding your phone. However, there are a few more settings that you can toggle to eliminate any type of vulnerability of your personal data. So take a moment to go through all the impactful Android Security Settings changes you must make as soon as possible. Ready, let’s see how you can secure your Android phone:
1. Opt-Out of Ads Personalization
Did you know that Google shows you different ads based on your interest? Yes, Google collects your data and online activities and shows you personalized ads depending on that. Suppose you want to buy a laptop and have searched on Google for the best budget laptop to check the prices; next, you’ll see that Google is showing you laptop ads from various retailers. Well, Google personalizes the ads to increase the chances of you clicking those.
Also Read: Top 5 Most secure Phones In The World That Can’t Be Hacked!
Now some people don’t find anything wrong in this, but others don’t like the fact that Google is capturing data to show targeted interest-based ads. If you also belong to the second category, here is what you can do. You can just opt out of Ads Personalization to stop Google from showing such ads. But that doesn’t mean you won’t ever see an ad from Google. Of course, you will, but it will not be based on your interest.
How to Opt-Out of Interest-based Google Ads?
Step 1: At first, open the Android Settings menu from your phone
Step 2: Next, scroll down, find, and tap on ‘Google’
Step 3: Now you’ll find ‘Ads’ under the SERVICES section, tap it
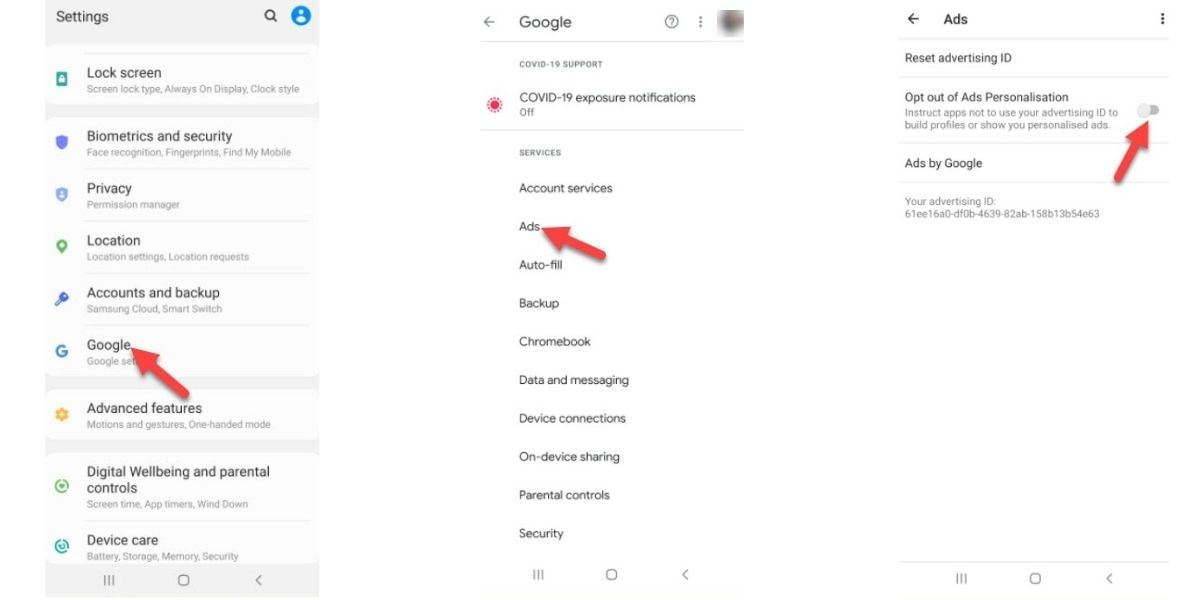
Step 4: Finally toggle the bar beside ‘Opt out of Ads Personalization
Step 5: A pop-up notification will appear for the final confirmation, tap on OK, and you’re done!
Also Read: How To Stop Android Apps Running In The Background!
2. Enable Google Play Instant
Most of us often download different apps for one-time use. We share our personal data there but never really delete all these apps. For instance, suppose you have installed a yoga app. Now, after installing it and registering with your email ID, and other personal details, you suddenly find that the app shows several ads which is interrupting your user experience. So, you want to try another app. In such cases, most of us don’t delete our accounts before uninstalling the app.
Moreover, certain applications don’t even provide you with the delete account option just lets you sign out of your account. Hence, you give access to your data unnecessarily.
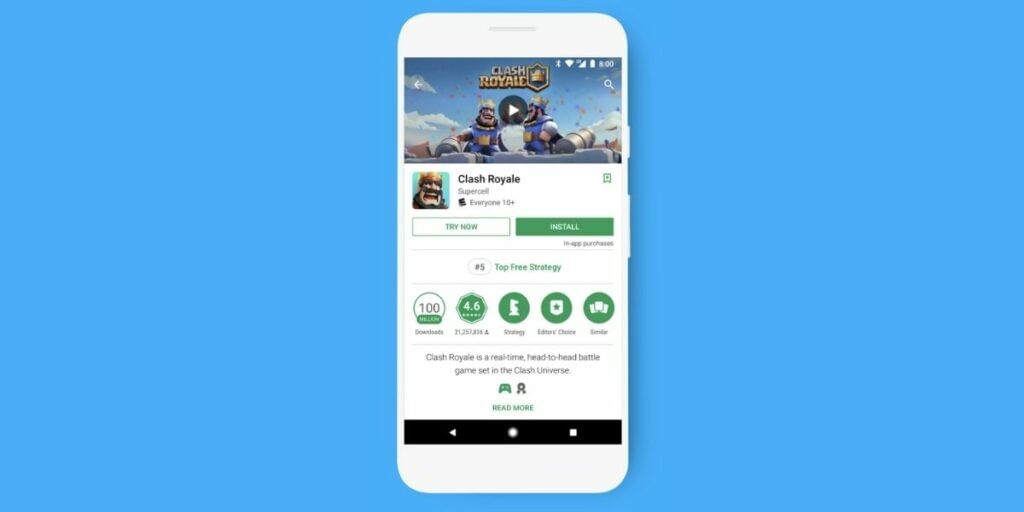
Google Play Instant is a feature that was introduced a couple of years ago, which allows you to use/try supported apps before installing it. Yes, when you turn on these settings, it shows you the ‘Open App’ option instead of ‘Install’ on the Play Store. That’s why you get saved from sharing your data with any third-party application. Below are the steps to turn on Google Play Instant.
Also Read: How To Setup A VPN An Windows, Android, iOS, Or Chrome OS!
How to Enable Google Play Instant?
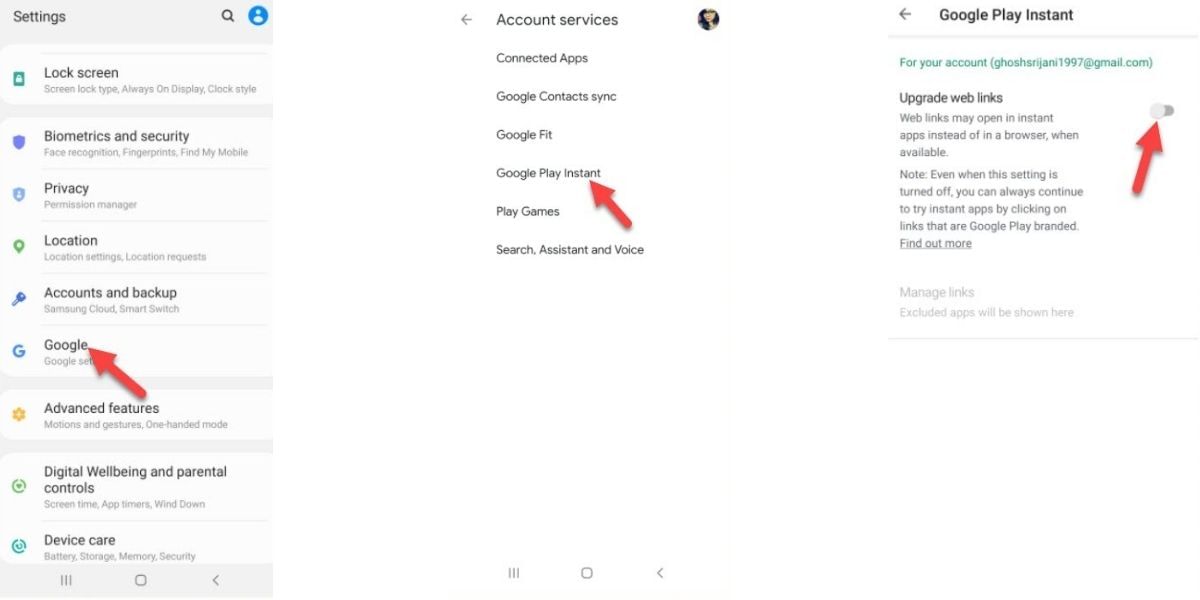
Step 1: Open the Settings menu
Step 2: Tap on ‘Google‘ and go to the next page
Step 3: Now select ‘Account services‘
Step 4: Find and tap ‘Google Play Instant‘ from this page
Step 5: Finally, toggle the bar next to ‘Upgrade web links.’
Also Read: The Best Android VPN Apps 2020 Edition
3. Change Your Privacy Settings
Sometimes we allow our Android smartphone to gather our data unknowingly. Suppose you haven’t ever changed your Privacy Settings while attempting for the first time. In that case, you will know how inessential it is to keep all those options like “Send diagnostic data” or “Receive marketing information” turned on.
When these options are enabled, your phone’s manufacturer receives all your personal information. They also show you their product ads based on your interest. So, it’s important to strengthen your Privacy to safeguard your sensitive information. Here is how to do it.
Also Read: How To Recall A Message Sent On WhatsApp: Undo Your Mistakes!
How to Make Changes in Privacy Settings?
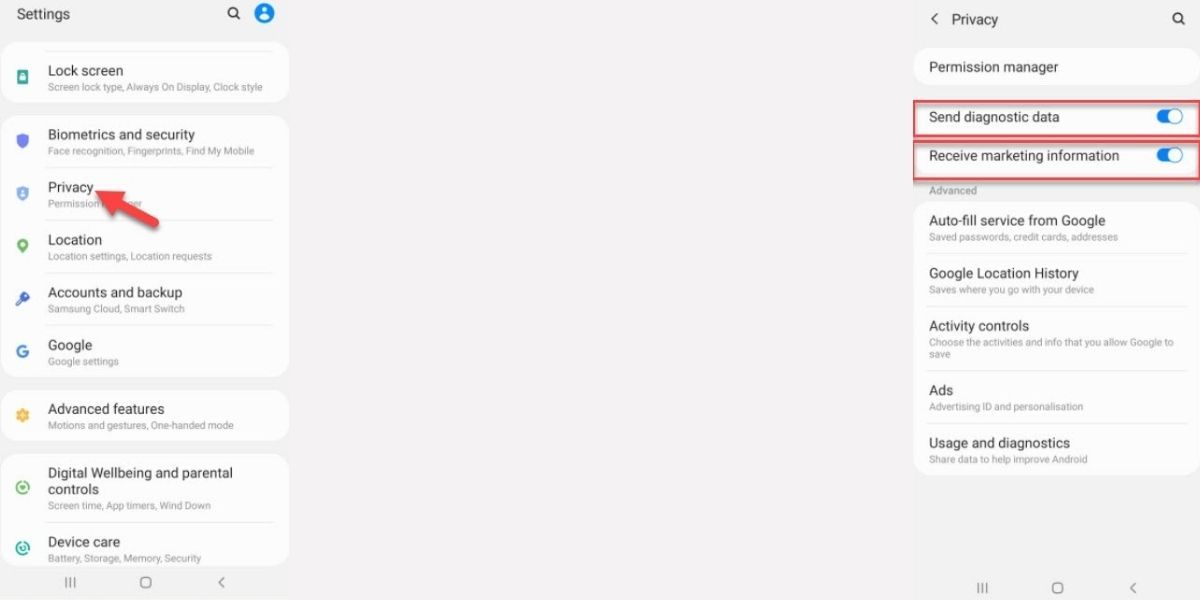
Step 1: First open Settings and scroll down to tap on ‘Privacy‘
Step 2: Next, find ‘Send diagnostic data’ and ‘Receive marketing information’
Step 3: Finally, disable both by toggling off the bars next to each
Note: You can also set your privacy as per your wish by changing permissions for each installed application. To do so, go to Settings> Privacy> Permission manager and restrict permissions for every app.
4. Turn Off Auto-save Location History
Don’t want Google to track your locations? Nothing to worry about! Android allows you to turn off auto-save location history. Whenever we travel to different places, Google collects data like where, when, etc. Some people find it useful to save memories and get location-specific data such as traffic details and more. But some are there who wish not to track their location.
If you also don’t want to share your location coordinates, just make a few changes in your Privacy settings. Follow the steps below to do so.
How to Turn-off Google Location History?
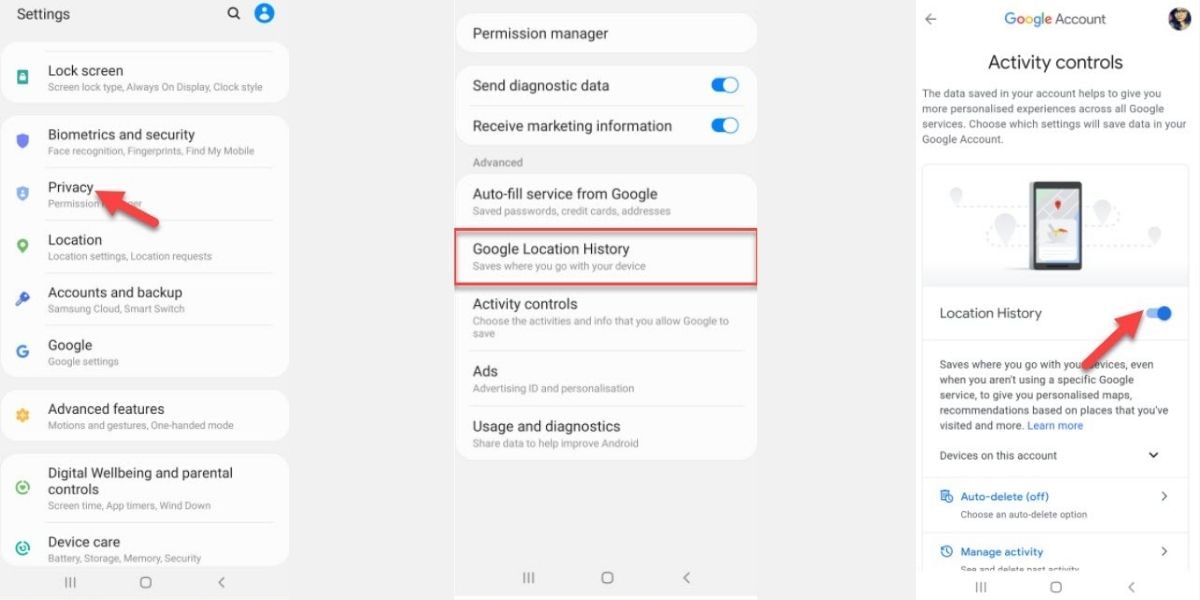
Step 1: Firstly, open Settings and tap on Privacy
Step 2: Next, tap on ‘Google Location History‘
Step 3: From the next page, toggle the bar next to Location History, and you’re all set!
Also Read: How To Download, Send, And Manage WhatsApp Sticker Packs?
5. Hide Sensitive Notification from the Lock Screen
As you already know that your Android phone shows notifications on the lock screen, starting from your messages, and emails, to OTP and more. While using your phone publically, this useful feature can invite some unwanted problems. Moreover, if your phone falls into the wrong hands, then your personal stuff can be breached.
To prevent such situations from occurring, you must enable the option ‘Hide Content.’ Doing so will leave your lock screen notification free. Now check out the steps to do that.
How to Hide Notifications from the Lock Screen?
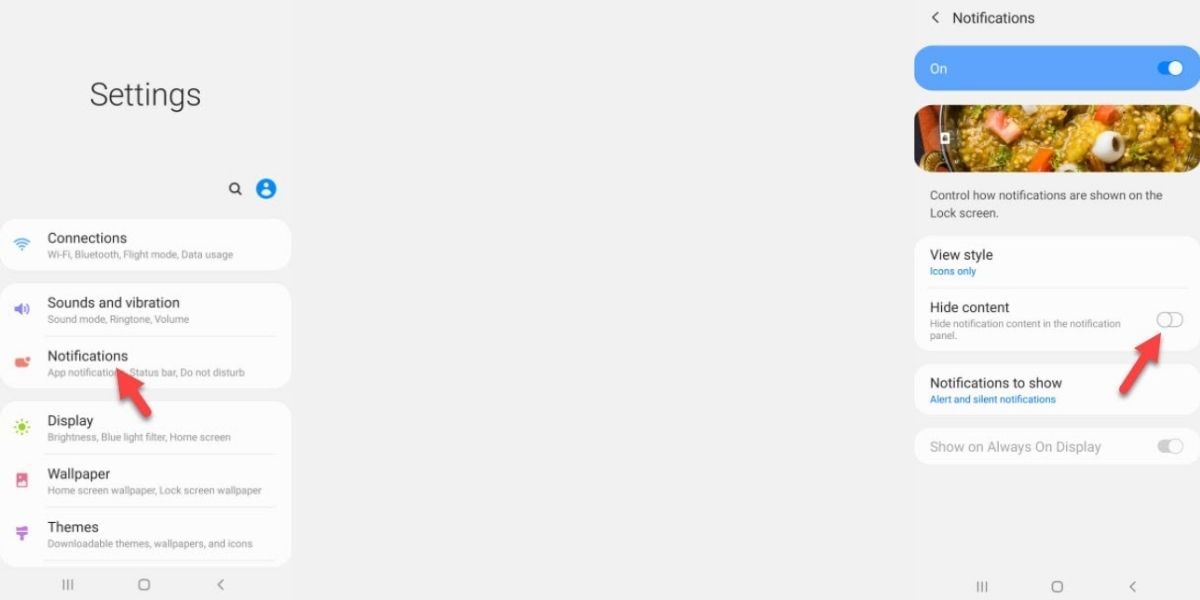
Step 1: Go to Settings and tap on ‘Notifications‘ first,
Step 2: Then, find and select ‘Notifications (Lock screen)’,
Step 3: Finally, toggle the bar next to ‘Hide content‘, and that’s all!
Always remember the options we’ve shown here may vary depending on the model and brand of your phone. So, you must check the options carefully before you make changes in Android Settings and secure your android phone.
Also read: Best Mobile Phones Under 50,000
For the latest smartphone news, stay tuned to Cashify. We also allow you to compare mobile phones to find the better one before buying.


